Tree Stands & Blinds
How To Make A Ghillie Suit: In Simple Steps
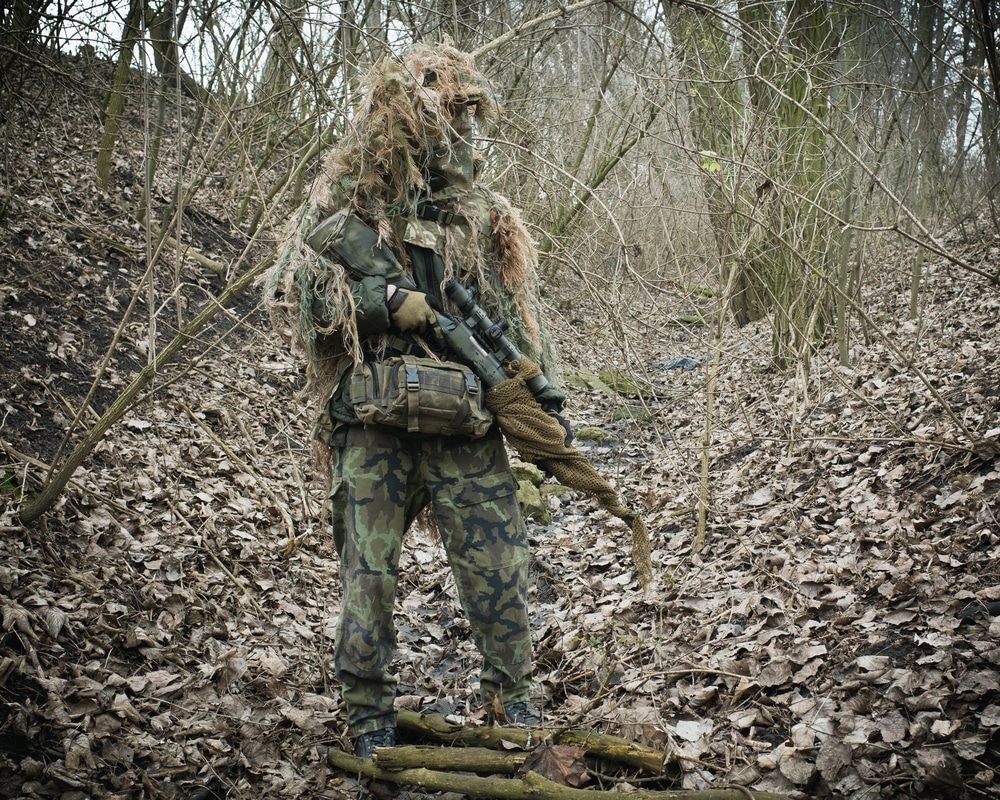
If you’re an outdoors enthusiast who spends a lot of time hiding in the forest whether it be for paintball, hunting season, or other stealth activities, it’s a good idea to have your own custom-made ghillie suit to keep you camouflaged. Ghillie suits are useful tools in a variety of climates and can be easily made at home so you can customize the suit to best fit your needs. In this article, we will teach you how to make a ghillie suit in 6 simple steps.Camouflage is a great tactic that gives you more opportunities to sneak up on a target or remain hidden in plain sight. We know it’s difficult to find specialty gear like ghillie suits for an affordable price, so we have taken the time to prepare this article to help you learn how to make a ghillie suit on a budget. As we move through this article, we will highlight background information about ghillie suits, how to make a ghillie suit at home, and helpful tips to remember as you craft.
What Is a Ghillie Suit?
A ghillie suit is an awesome camouflage technique that gives you full coverage with three-dimensional aspects that create the illusion you are just as much a part of the landscape as any tree or bush. These ghillie suits get their name from similar outfits used by Scottish gamekeepers to help them stay blended into their environment for optimal stealth. Ghillie suits are ideal for adventurers who want to disappear in nearly plain sight, military snipers, undercover surveillants, hunters, and paintball players.
Insert Image
A ghillie suit is a full suit covered in burlap and other lively materials that breaks up your silhouette causing you to blend in seamlessly with your surroundings. Traditional commercial camouflage only works as a two-dimensional solution that will help you blend in to the distant viewer, but will still reveal your shape when spotted. When you first learn about this camouflage tactic, you may wonder how to make a ghillie suit that will cost a fraction of the price that major retailers charge. Below we discuss our favorite, detailed methods and steps for how to make a ghillie suit at home as a DIY project.
How to Make a Ghillie Suit: Materials
As you read through this article to learn how to make a ghillie suit, you may notice that you already own many of the materials to build a cheap yet durable ghillie suit. You can use ghillie suits in a variety of weather, so it is important to consider the environment you plan to wear your suit in and the various obstacles you could encounter there.
Remember that ghillie suits are great for hunting deer, turkey, duck, hog, and other wild game, so the seasons you use your ghillie suit in may vary significantly. Some easy items you could use to make your ghillie suit right now are an old camouflage jacket, a burlap sack and string, netting, floss, fabric dyes, military surplus camouflage clothing, spray paint, needles, felt, and hot glue. Let’s get started with our 6 simple steps to learn how to make a ghillie suit.
How to Make a Ghillie Suit in 6 Simple Steps
Before learning how to make a ghillie suit, we recommend gathering all your materials before you craft so the process takes less time. Below we highlight 6 simple steps for you to create an easy, unique, durable, and affordable ghillie suit from the comfort of your home. Although we outline the steps, we encourage you to be creative along the way and always consider the environment you will wear the ghillie suit in since this factor influences your color scheme. The first phase of learning how to make a ghillie suit is all about collecting and customizing your materials.
1. Gather Your Materials
Insert Image
It is easy for you to use an old jacket or neutral colored clothing as your base when building a ghillie suit. Other options are finding some comfortable camouflage at army surplus or at a second-hand store. Another method is to use spray paint and fabric patches to color your base clothing to match your surroundings.
Army surplus clothing will come with many convenient hooks, pockets, and straps to attach your ghillie suit materials much easier than having to sew everything on. You could also use military flight suits, battle dress uniforms, mechanic’s suits, or other outfits that are durable and comfortable to wear for long periods of time. Remember to choose the color scheme that best suits your terrain and environment, or else your ghillie suit will make you appear very obvious rather than camouflage you to disappear.
2. Sort the Netting & String
Insert Image
As you work through these steps to better understand how to make a ghillie suit, we recommend considering creating objects and materials that will work to compliment your suit. Think of personal items you can add to the suit to increase function while in the field. Burlap string is one of the main materials used to create a ghillie suit and it often comes wrapped or tangled in a package.
Pull the burlap string apart, piece by piece, and cut the string into 20-30-inch sections to prep the material for dyeing. You will need to dye the burlap string if you are working on a ghillie suit that will be worn in deep forest or dark environments. Apply this same process to whatever netting you are using – if the fabric is light-colored, prepare to dye it if applicable.
2. Sort the Netting & String
As you work through these steps to better understand how to make a ghillie suit, we recommend considering creating objects and materials that will work to compliment your suit. Think of personal items you can add to the suit to increase function while in the field. Burlap string is one of the main materials used to create a ghillie suit and it often comes wrapped or tangled in a package.
Pull the burlap string apart, piece by piece, and cut the string into 20-30-inch sections to prep the material for dyeing. You will need to dye the burlap string if you are working on a ghillie suit that will be worn in deep forest or dark environments. Apply this same process to whatever netting you are using – if the fabric is light-colored, prepare to dye it if applicable.
3. Dye Fabrics (Optional)
If you have neutral-colored fabrics that need to become darker, fabric dye is a quick, cheap, and easy option to create a cohesive color scheme for your ghillie suit. If you are using a burlap sap or burlap string, it will be necessary to dye this to match the colors of your environment. Consider colors such as brown, green, gray, and black as you dye your fabrics. Your fabric dye should have specific instructions and we recommend following them for best results.
Once you have successfully dyed your fabrics and burlap, rinse them thoroughly in cold water to remove excess dye. Once the water runs clean out of the fabric, you can hang the strands in a warm place to dry completely. Note that dyed fabric will appear darker when it is wet. Wait until your fabric has dried to determine if you have the right color.
If the fabric colors turn out to be too dark, bold, or unrealistic looking, you can dilute the color by dunking the fabric in a water and bleach solution. The ratio of bleach to water is 1:10 – start with this and adjust your solution from there depending on the color fade you want to achieve.
4. Attach Netting & String to Your Suit
You can use a variety of methods to attach your materials and supplies to your suit. Either sew, glue, weave, or tie your fabrics and netting to the ghillie suit. Depending on your environment and the density of your natural surroundings, you may need to layer the dyed fabric, string, and netting to give you more coverage or bulk.
Using hot glue first is a quick and easy way to attach layers of mesh and string together. You can then add a reinforcing stitch for long-lasting durability. You can also use dental floss to tie and secure fabrics as it is a strong thread that will not fray or shred. Tying knots is a great way to attach the string to your suit; remember to keep the strands short for a more natural look.
Create a random pattern to make the suit appear camouflaged. Be mindful of hooks, gaps, or loose fabrics that could easily catch on sharp obstacles resulting in a tear or rip in your ghillie suit. Secure these potential hazards so you can brush up against trees, branches, or sharp rocks without getting your suit caught.
5. Make a Ghillie Hood
Since you now know how to make a ghillie suit, we recommend completing your outfit with the addition of a ghillie hood. The ghillie hood will ensure that your silhouette is undetectable. You can use the mesh netting you already have and any extra fabric or burlap sack. Drape the fabric over your head as a veil or attach the mesh netting to a camouflage hat. Tie the dyed fabrics and strings to your hood piece, similar to the way you attached the pieces to your ghillie suit. Be mindful to create the same density and bulkiness of fabric on the hood as you did with the ghillie suit.
6. Finish Your Ghillie Suit
After you have attached the proper amount of fabrics and string for your environment, fluff up your suit and hood by lifting them up and lightly waving them in the air. This will help you identify any bald patches on your suit. Fill them with fabric. Stuff the netting and fabrics of the ghillie suit with organic material when you arrive at the field or environment you wear the suit in.
Add vegetation, leaves, grass, twigs, and other elements of your environment. Focus on filling out the shoulder area and around the head as this will help disguise your silhouette even more. Remember that true ghillie suits consist of around 40 percent burlap or fabric and 60 percent organic material from your surroundings.
Tips
Here are some quick tips to consider as you finish learning how to make a ghillie suit. We recommend using a camo netting to cover your face, shoes, gloves, and any other part of your gear that could be identified. Test the suit outdoors and see how effective the camouflage really is and know of natural obstacles that may snag or interfere with your suit. Move front to back as you maneuver in the ghillie suit and don’t hide behind trees or natural features with straight lines.
If you are using the ghillie suit for consecutive days in the field, remember to add more organic material to maintain a bulky and natural appearance. Perhaps the most important tip we have is to remember that a ghillie suit does not make you invisible – so calculate your moves wisely and study shadow patterns to help you stay protected.
Conclusion
We hope you have found this information to be helpful as you learn how to make a ghillie suit at home. It is important to use quality materials that will not fray and break down over time so you can get the longest use out of your ghillie suit. Having a homemade ghillie suit gives you more opportunity for customization, saves money, and ensures that you have the perfect color scheme to match whatever your surroundings may be.